Installation of TLS certificate on Kerio Connect server
Kerio Connect is a groupware and email server for companies. Installation of SSL/TLS certificate is very simple and besides saving the certificates on the server, you only need to adjust the settings in the administration interface.
Installation of the certificate on the server via the administration interface
The easiest way to install TLS certificate on Kerio is through the administration interface. The whole process is divided into two steps - creating a certificate request and importing the issued certificate back to Keria.
Create a CSR (certificate request)
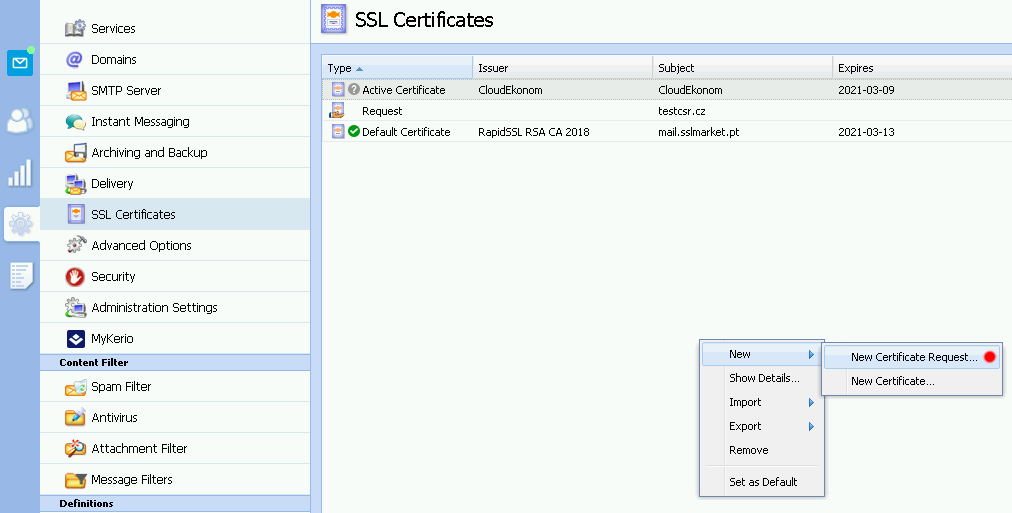
In the list of all TLS certificates on the server, right-click a free space and select New -> New Certificate Request from the menu. This will lead you to create a CSR request that is necessary for issuing a certificate. After completing all information about the applicant, save the CSR.
You can view the contents of the Request by clicking on it in the Source tab; just copy this CSR text into your order. You can also export it as a file and then paste the content into an SSLmarket order, or email it to us.

Import certificate after issue
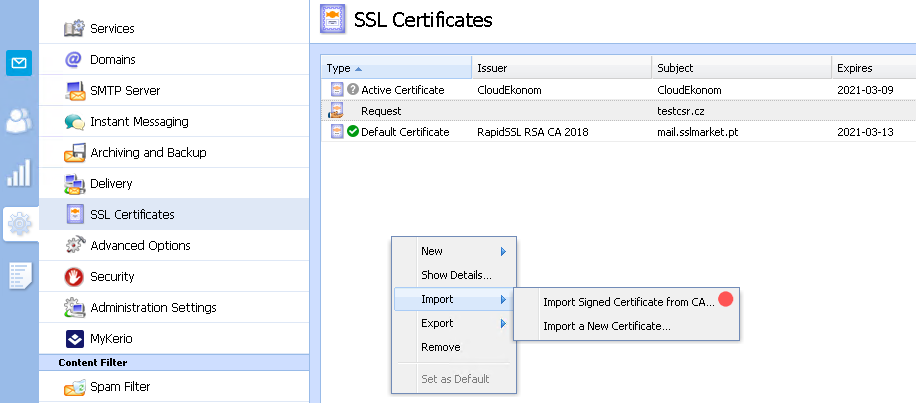
Once issued, you need to import the certificate to the server where the appropriate request (CSR) is waiting. Click Import -> Import CA Issued Certificate . This option is active only when the server is waiting for a request (CSR). Then confirm the upload of the certificate file that you received from us by email. You can also choose the certificate file and the linux_cert+ca.pem intermediate file that both import together.

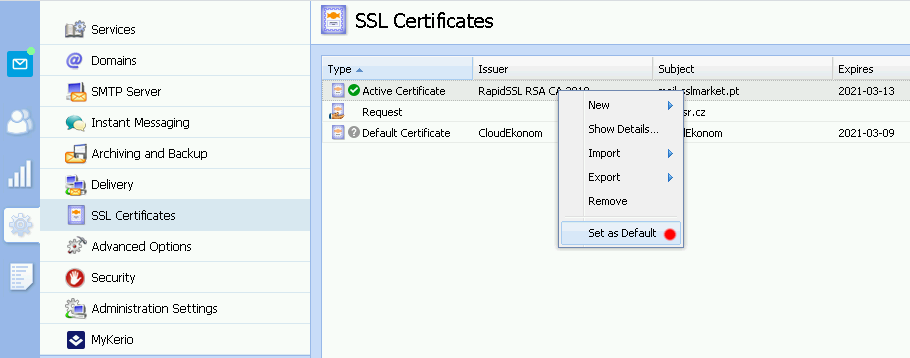
After importing, the new certificate should be set automatically by default. If it does not, switch it on (see next paragraph). Installation is now complete and the new certificate will be active on the webmail web interface.
Import certificate with private key
If you did not create the certificate request on the server but created it directly in the SSLmarket interface, you now have the private key downloaded on your computer and need to be imported with the certificate in one step.
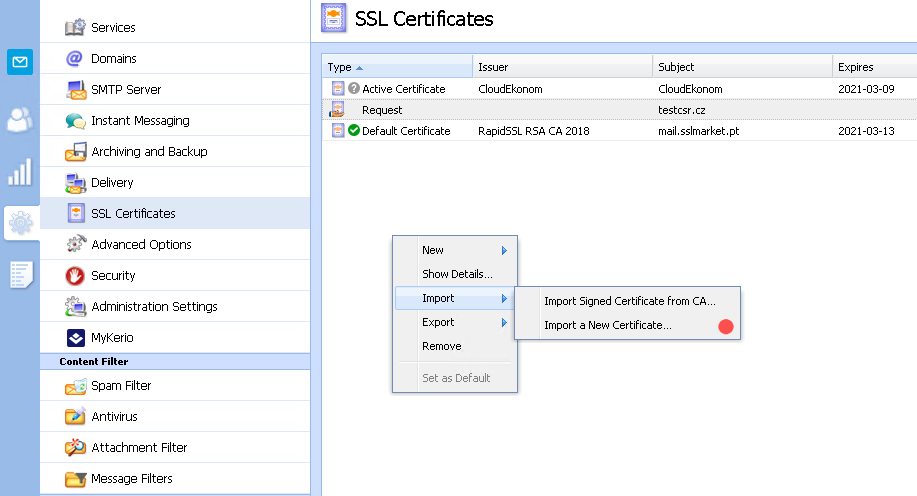
In the list of all TLS certificates on the server, select Import -> Import new certificate below. Then select the linux_cert+ca.pem certificate file and private key. You received the certificate from SSLmarket in an email and the private key was downloaded to your computer after it was generated in our administration. Certificates are stored in text form (Base64), so it is irrelevant whether you use PEM, CRT or TXT.
After the certificate is imported, it will appear in the overview. In one step, you also imported the intermediate certificate, which is needed on the server for the credibility of the certificate, especially in mobile.

Select the newly issued certificate as Default and will be used as active from now on.

Manually install the certificate on the server
The issued SSL certificate is delivered by email. The certificate arrives in text form encoded in Base64 format. Create a .crt file (give it the same name as the CSR file, but use the crt extension instead of the csr extension) and copy it to your server in the /sslcert/ folder.
On the server, find the /sslcert/ directory, whose location varies depending on the platform on which the server is running:
- Apple Mac OS X:/usr/local/kerio/mailserver
- Microsoft Windows: C:/program files/kerio/mailserver
- Linux Red Hat: /opt/kerio/mailserver
You will have three files on the server with the same name but with a different extension: CSR (*.csr), private key (*.key) and your SSL certificate (*.crt).
Download the intermediate certificates needed for proper trust and save them to a crt file. Place the file in the /sslca/.
Restart the server. Log in to the Admin Console and select a new certificate under Configuration/SSL Certificates . Click Set as active , then restart the service. This completes the installation.
You can verify that the TLS certificate is installed with the CA tool. For more information, read the section Checking the Installation of SSL Certificates in the Certificate Installation Help article.
Please feel free to contact our customer support, who will help you with any problem.

We are sorry that you did not find the required information here.
Please help us to improve this article. Write us what you have expected and not found out.